
For photorealism, OpenAI’s GPT Image (DALL·E) is the go-to. For stylized concept art and illustration, Midjourney consistently delivers. And if you want to experiment right now without spending a dime, Bing Image Creator gets you generating in under two minutes. Those three cover most use cases, but the full picture is richer than that.
Here’s a quick shortlist to get you moving:
- OpenAI / DALL·E / ChatGPT Image 2 — photorealism and product shots; best for marketers who need clean, commercial-grade visuals with multi-turn editing support.
- Midjourney — stylized art and concept illustration; best for creators who want a distinctive aesthetic and fast community-driven iteration.
- Bing Image Creator — free, beginner-friendly, no friction; start here if you’ve never used an AI image tool before.
- Adobe Firefly — product and brand visuals with clear commercial-use guidance; best when licensing transparency matters.
- Stable Diffusion / DreamStudio — offline control and custom training; best for privacy-sensitive or highly customized workflows.
- LeonardoAI — fine-grained style controls and community presets; best for concept artists who want to dial in an aesthetic.
Try Bing Image Creator first with this prompt: “a flat-lay product photo of a coffee mug on a marble surface, soft natural light, top-down angle, minimal style” — then jump to the quick-start steps below.
Key Takeaways
The most effective approach to AI image generation is to match the tool to your use case, test with a consistent prompt across two or three options, and verify commercial licensing before publishing any output.
| Point | Details |
|---|---|
| Match tool to output style | Use DALL·E or FLUX for photorealism, Midjourney or LeonardoAI for stylized art, Ideogram or Recraft for illustration. |
| Start free, then scale | Bing Image Creator and LeonardoAI free tiers cover exploration; switch to paid API access when generating at volume. |
| Iterate, don’t regenerate | Use mask-based edits and multi-turn prompts to refine a good draft rather than starting from scratch each time. |
| Check licensing before commercial use | Commercial rights, training-data policies, and watermarking standards vary across platforms — read the generative AI terms first. |
| Willbuckley for structured workflows | Willbuckley’s coaching and blog resources show affiliate marketers how to integrate AI image tools into a repeatable marketing system. |
Table of Contents
- Which AI image generators should you compare first?
- How do you generate your first AI image in under 10 minutes?
- Prompt-writing tips that actually improve your outputs
- How to refine images with edits, masks, and multi-turn workflows
- How pricing and free tiers typically work across these tools
- What you need to know about commercial rights and image watermarking
- How to pick the right generator for your specific project
- What trends are shaping AI image generation right now?
- My honest take on where to start
- What Willbuckley offers creators who want more than a tool comparison
- Sources
Which AI image generators should you compare first?
Recent roundups consistently show that readers want both accessibility and high output quality, which is why the best comparison spans hosted web apps, Discord-driven tools, and local open-source models. The table below covers the 20 tools this guide examines across the dimensions that actually matter for your workflow.
| Tool | Best for | Cost model | Ease of use | Editing / masks | Platform | Commercial license |
|---|---|---|---|---|---|---|
| OpenAI / DALL·E / GPT Image | Photorealism, product shots | Free tier + pay-per-image / API | Web + API | Yes — edits endpoint, masks, multi-turn | Web, API | Yes, per OpenAI terms |
| ChatGPT Image 2 | Conversational image creation | Included in ChatGPT Plus | Very easy | Multi-turn chat edits | Web | Yes, per OpenAI terms |
| Midjourney | Stylized art, concept illustration | Subscription tiers | Discord / web | Variation, remix | Discord, web | Yes (paid plans) |
| Adobe Firefly | Brand/product visuals, commercial use | Free tier + subscription | Very easy | Style controls, reference upload | Web | Explicit generative terms |
| Stable Diffusion (local) | Custom training, offline, privacy | Free (local) | Technical | Full inpainting, ControlNet | Local installation | Varies by model license |
| DreamStudio (Stability) | Hosted SD with fine controls | Credits | Moderate | Inpainting, outpainting | Web, API | Check Stability terms |
| Bing Image Creator | Beginners, fast free experiments | Free | Very easy | Basic retouching | Web | Microsoft terms |
| LeonardoAI | Concept art, style presets | Free tier + subscription | Easy | Canvas editor, inpainting | Web | Yes (paid plans) |
| Ideogram | Illustration, text-in-image | Free tier + subscription | Easy | Limited | Web | Yes |
| BlueWillow | Community iteration, Discord prompts | Free (Discord) | Discord | Limited | Discord | Check terms |
| DeepAI | Simple API experimentation | Free tier + pay-per-call | Easy (API) | Basic | Web, API | Check terms |
| FLUX | High-fidelity photorealism | Open-source / hosted | Moderate | Varies by implementation | Local, API | Check model license |
| Recraft | Vector and design-system outputs | Free tier + subscription | Easy | Style controls | Web | Yes |
| Reve | Fast creative drafts | Free tier | Easy | Limited | Web | Check terms |
| Seedream | Multilingual prompts, diverse styles | Free tier | Easy | Limited | Web | Check terms |
| Nano Banana (Gemini) | Iterative edits, provenance-aware | Free (Gemini app) | Easy | Iterative edits, style transfer | Web (Gemini) | Google terms |
| Nano Banana Pro | High-quality Gemini outputs | Gemini Advanced subscription | Easy | Full iterative editing | Web (Gemini) | Google terms |
| BlueWillow | Community prompts, rapid iteration | Free | Discord | Limited | Discord | Check terms |
| DALL-E (standalone) | Same as OpenAI / GPT Image | See OpenAI pricing | Web | Edits, masks | Web, API | Yes |
| DeepAI (text2img) | Rapid API prototyping | Free + pay-per-call | API-first | Basic | Web, API | Check terms |
A few things worth calling out after that table. Stable Diffusion is the only option here that runs fully offline, which matters if you’re working with sensitive product images or proprietary brand assets. Midjourney still has no native inpainting on par with OpenAI’s edits endpoint, so if mask-based editing is central to your workflow, DALL·E or LeonardoAI’s canvas editor will serve you better. DeepAI exposes a straightforward text-to-image endpoint that’s genuinely useful for rapid API prototyping, even if its output quality trails the premium models.
How do you generate your first AI image in under 10 minutes?
Whether you’re using a web app or an API, the core workflow is the same five steps.
- Create an account or get an API key. For web tools (Bing Image Creator, Adobe Firefly, LeonardoAI), sign up with an email. For API paths (OpenAI, DeepAI), grab an API key from the developer dashboard. OpenAI’s image generation API documents both the Generations and Edits endpoints clearly.
- Write your prompt. Start simple: subject + style + lighting. Example: “a ceramic coffee mug on a marble countertop, product photography, soft diffused light, top-down angle, 1:1 aspect ratio.”
- Select your model and aspect ratio. Most web UIs let you pick from presets (square, landscape, portrait). API users set
sizeandqualityparameters directly. - Generate and review. Most tools return 1–4 options. Pick the closest result, not the perfect one — you’ll refine from here.
- Save the output and note your prompt. Keep a prompt log. You’ll reuse and tweak these more than you expect.
For image-to-image workflows, upload a reference photo at step 2 instead of starting from text alone. This is especially useful for product shots where you need consistent composition across a series. Canva’s AI generator documents this well: reference images preserve composition and allow style transfer, which tightens consistency across a batch.
Prompt-writing tips that actually improve your outputs
The single biggest mistake beginners make is describing only the subject. The model needs more context than that.
Order your prompt like a camera brief: subject → action or setting → style → lighting → camera angle → aspect ratio. That sequence mirrors how the model processes compositional cues, and it reduces the chance of getting a generic, flat result.
Here are four annotated examples you can paste and adapt:
- Photorealism: “A glass bottle of olive oil on a rustic wooden table [subject + setting], product photography [style], warm golden-hour side lighting [lighting], eye-level close-up [camera angle], 4:5 aspect ratio [format].”
- Illustration: “A cartoon fox wearing a backpack hiking through a forest [subject + action], flat vector illustration [style], bright pastel colors [palette], no shadows [lighting note], square format.”
- Product shot: “White wireless earbuds in an open charging case [subject], clean white background [setting], commercial product photography [style], soft studio lighting [lighting], overhead angle [camera angle].”
- Stylized concept art: “A futuristic city at night [setting], neon-lit rain-soaked streets [atmosphere], cyberpunk illustration [style], dramatic low-angle perspective [camera angle], wide 16:9 format.”
Notice that every example names a camera angle. Adobe Firefly’s prompt guidance makes this explicit: specifying framing and camera angle often matters as much as naming the subject itself, because compositional terms directly shape how the model frames the scene.
Pro Tip: Add a negative prompt when your tool supports it. Writing “no text, no watermark, no blurry background” in the negative field removes common artifacts faster than trying to describe them away in the positive prompt.
How to refine images with edits, masks, and multi-turn workflows
Generating a great image on the first try is rare. The real skill is knowing when to regenerate versus when to edit.
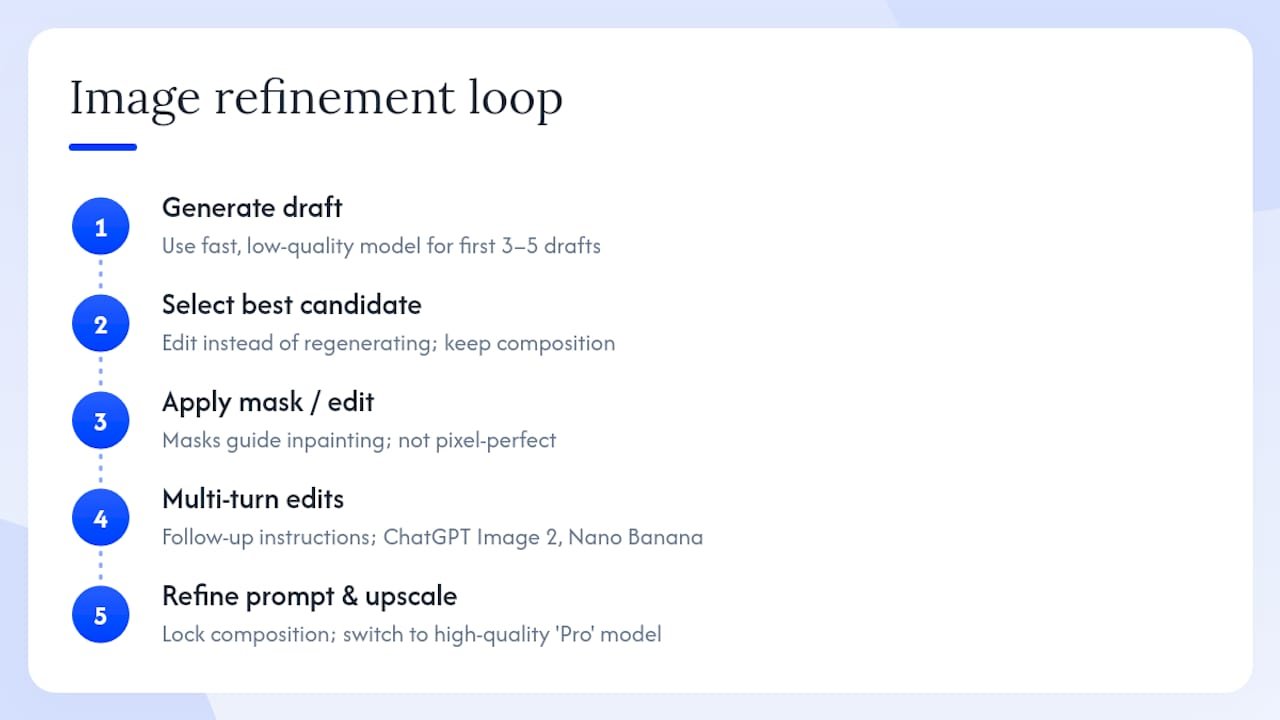
Think of it as a four-stage loop: generate a draft, select the best candidate, apply a mask or edit to fix the specific problem area, then refine your prompt and upscale the final version. Skipping straight to “regenerate from scratch” wastes time and loses the composition you already liked.
Mask-based editing (inpainting) lets you preserve the parts of an image that work while replacing a specific region. OpenAI’s edits endpoint supports mask-based edits directly, and the documentation is clear that masks are guidance, not pixel-perfect instructions — the model interprets the masked region, so slight variations are normal. For tighter control, LeonardoAI’s canvas editor and Stable Diffusion’s ControlNet give you more precision.
Multi-turn conversational editing is where tools like ChatGPT Image 2 and Nano Banana (Gemini) pull ahead. Instead of re-entering a full prompt, you type a follow-up instruction: “make the background darker” or “replace the mug with a glass bottle.” Gemini’s Nano Banana models support exactly this kind of iterative editing, and they apply both visible labels and SynthID invisible watermarking to every output, so provenance travels with the image through each edit.
Pro Tip: Use a fast, low-quality model pass for your first three to five drafts. Once you’ve locked in the composition you want, switch to the high-quality or “Pro” model setting for the final render. This saves credits and time without sacrificing the end result.
How pricing and free tiers typically work across these tools
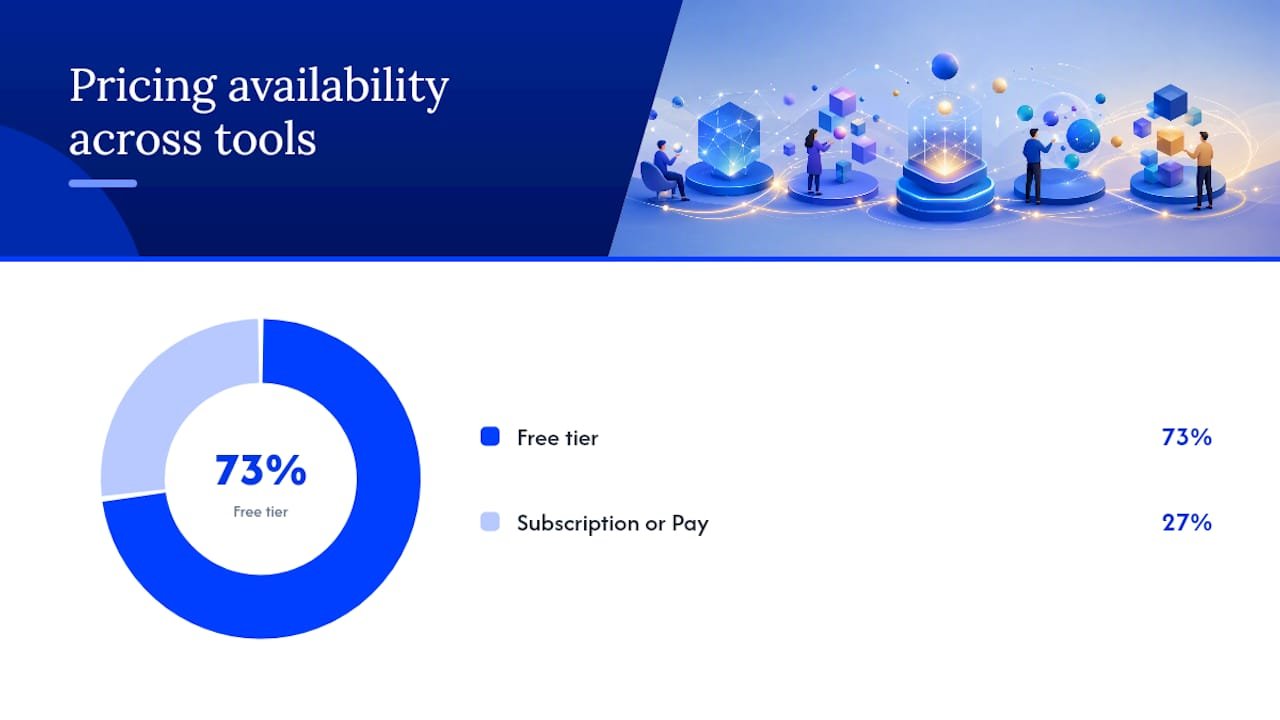
Pricing structures vary more than you’d expect, and the free tier limits are where most beginners get surprised.
- Bing Image Creator — fully free, no subscription needed, with daily generation limits. The templates and editing tools are accessible without an account on some browsers.
- Adobe Firefly — free tier with monthly generative credits; subscription plans unlock higher limits and commercial-use assurances.
- OpenAI / DALL·E / ChatGPT Image 2 — ChatGPT Plus subscribers get image generation included; API access is pay-per-image with configurable quality tiers.
- Midjourney — subscription-only after a trial period; higher tiers unlock faster generation and private mode.
- LeonardoAI — free tier with daily token limits; paid plans add faster generation and more style presets.
- Stable Diffusion (local) — free to run locally if you have the hardware; DreamStudio (the hosted version) uses a credit system.
- Nano Banana / Nano Banana Pro — available through the Gemini app; Pro features require a Gemini Advanced subscription.
- DeepAI — free tier for basic generation; pay-per-call API for higher volume.
- Ideogram, Recraft, Reve, Seedream, FLUX — all offer free tiers with generation limits; paid plans vary by tool.
- BlueWillow — free via Discord, with community-based generation.
For API use, the calculus shifts. If you’re batch-generating product images or automating thumbnail creation for a content workflow, an API subscription almost always costs less per image than manual UI generation at scale. For ad-hoc creative work, the web UI is faster to iterate. Start with free tiers on two or three tools before committing to a paid plan — the prompt that works beautifully in one tool may fall flat in another.
What you need to know about commercial rights and image watermarking
Licensing is the part most creators skip until it causes a problem. Don’t do that.
Before you use any AI-generated image commercially, check three things in the platform’s terms:
- Commercial use rights — does the platform grant you ownership or a license to use outputs for commercial purposes? This varies significantly. Creator-rights organizations advise reading generative AI terms carefully, because some platforms retain rights or restrict commercial use on free tiers.
- Training data transparency — does the platform disclose what data trained the model? This matters for brand safety and potential legal exposure.
- Watermarking and provenance — does the platform embed visible or invisible markers in outputs?
On watermarking specifically: SynthID is Google’s invisible watermarking standard, embedded at the pixel level so it survives compression and resizing. Gemini’s Nano Banana models apply both visible AI labels and SynthID to every generated image. Adobe Firefly embeds Content Credentials metadata. OpenAI’s outputs carry provenance metadata as well. These markers matter because platforms, publishers, and regulators are increasingly requiring disclosure of AI-generated content.
Before uploading private or proprietary images as reference inputs, check the platform’s data-use policy. Some services use uploaded images to improve their models by default; others offer opt-out settings or guarantee no training on user uploads.
How to pick the right generator for your specific project
Use this checklist before you commit to a tool:
- Define your output style need. Photorealism? Illustration? Vector/design-system output? Match the tool to the style: DALL·E and FLUX for photorealism, Midjourney and LeonardoAI for stylized art, Ideogram and Recraft for illustration and vector work.
- Set your budget. Free tiers on Bing Image Creator, Ideogram, or LeonardoAI cover most exploratory work. API access makes sense once you’re generating at volume.
- Assess your editing needs. If you need mask-based inpainting, prioritize DALL·E, LeonardoAI, or Stable Diffusion. If conversational multi-turn editing matters, ChatGPT Image 2 or Nano Banana are the cleaner options.
- Check workflow integration. Does the tool have an API you can connect to your existing stack? OpenAI and DeepAI both offer documented endpoints. Local Stable Diffusion variants integrate with tools like ComfyUI and Automatic1111 for full pipeline control.
- Verify licensing before commercial use. Adobe Firefly and OpenAI have explicit commercial-use terms. Others require closer reading.
For the testing routine: pick two or three tools, run the same prompt in each, and compare on three axes — composition fidelity (did it follow your framing instructions?), style accuracy (does it match the aesthetic you described?), and cost per usable image. One round of this test usually reveals a clear winner for your specific use case.
Local Stable Diffusion variants are the right call when you need offline operation, custom model fine-tuning, or when uploading images to a hosted service raises privacy concerns. For everything else, a hosted web app or API is faster to start and easier to maintain.
What trends are shaping AI image generation right now?
Three shifts are worth tracking if you’re building these tools into a regular workflow.
Invisible watermarking is becoming a baseline expectation, not a premium feature. SynthID adoption is spreading beyond Google’s own tools, and platforms like Adobe are embedding Content Credentials as standard. If you’re creating images for publication or commercial use, choosing a provenance-aware tool now saves you from retrofitting compliance later.
Conversational, multi-turn editing is replacing the old “prompt and pray” approach. The best tools treat image generation as a dialogue: you generate a draft, give a follow-up instruction, and the model refines in context rather than starting fresh. This workflow produces better results faster, and it’s the direction the whole category is moving.
Composition framing is getting more attention in professional workflows. Naming camera angles, aspect ratios, and lighting setups in your prompts isn’t just a nice-to-have — it’s the difference between a generic output and something usable. Treat prompt engineering as a structured, repeatable process, not a creative guessing game.
Model versions update frequently. Before you rely on a tool for a production workflow, check which model version you’re using and whether the platform’s terms have changed since you last reviewed them. Both output quality and licensing conditions can shift between versions.
My honest take on where to start
If you’re new to AI image tools and you want results fast, start with two: Bing Image Creator for free experimentation and ChatGPT Image 2 (or DALL·E via the API) for anything you plan to use commercially. Those two cover the widest range of use cases with the least friction.
Once you’ve run a few dozen prompts and have a feel for what the models respond to, add LeonardoAI or Midjourney for stylized work, and consider Stable Diffusion locally if you’re doing anything that involves proprietary images or custom model training.
The biggest mistake I see is spending too long choosing a tool instead of generating images. Pick one, run the quick-start prompt from the top of this guide, and iterate from there. The learning curve is in the doing, not the research. If you want structured help applying these tools to an affiliate marketing workflow, the Willbuckley blog has practical posts on exactly that.
What Willbuckley offers creators who want more than a tool comparison
You’ve now got a solid shortlist and a workflow to test. But knowing which tool to use is different from knowing how to build AI image creation into a marketing system that actually drives results.
Willbuckley is built for affiliate marketers and solopreneurs who want to use AI tools, including image generators, as part of a broader, repeatable marketing workflow. Instead of piecing together tutorials from a dozen sources, you get coaching, video walkthroughs, and practical frameworks that show you how to create AI product images, blog visuals, and thumbnails that support your affiliate promotions. The focus is always on saving time while producing content that converts. If you’re ready to move from experimenting with prompts to building a system, start with the Willbuckley coaching resources and see how AI fits into your full marketing stack.
Sources
Before you commercialize any AI-generated image, go directly to the source. Each platform publishes its own generative AI terms, and those documents are the only authoritative answer on what you can and can’t do commercially. The citations throughout this guide link to the official product and developer pages for Adobe Firefly, OpenAI’s image API, Bing Image Creator, DeepAI, Gemini’s Nano Banana, and Canva — those are the pages to bookmark and revisit whenever a platform announces a model update.
Creator-rights organizations like the Copyright Alliance publish ongoing guidance on how generative AI terms are evolving, which is worth checking if you’re building a commercial workflow that depends on AI-generated assets. For practical how-to posts on using AI image tools inside an affiliate marketing workflow, the Willbuckley blog covers the applied side of what this guide introduces.
- Nano Banana 2 – Gemini AI image generator & photo editor
- Image generation | OpenAI API
- Free AI Image Generator – Bing Image Creator
- AI Image Generator
- Protecting creators — generative AI
- The 8 best AI image generators in 2026